The Soul Cairn holds plenty of secrets, but few are as deliberately hidden as the Reaper Gem fragments. This three-piece collectible in the Dawnguard DLC isn’t just another trinket, it’s a key that summons one of the toughest optional bosses in the entire game. Most players wander through the Soul Cairn, complete the main quest, and leave without ever realizing they walked past the fragments scattered across the desolate landscape.
The Reaper Gem doesn’t announce itself with quest markers or convenient journal entries. It rewards exploration, curiosity, and the willingness to poke around every crumbling tower and glowing crystal formation. Once assembled, it triggers a fight that can humble even veteran Dragonborns who’ve cleared legendary dragons without breaking a sweat.
This guide covers everything: exact fragment locations with landmarks, step-by-step assembly instructions, combat strategies for the Reaper boss fight, and an honest assessment of whether the rewards justify the effort. No vague directions, no filler, just the information needed to track down this hidden challenge.
Table of Contents
ToggleKey Takeaways
- The Skyrim Reaper Gem is a three-piece collectible hidden throughout the Soul Cairn in the Dawnguard DLC that summons a challenging leveled undead boss when assembled.
- All three Reaper Gem fragments are located on pedestals in open areas: one at the Reaper’s Lair entrance, one at the Northern Tower Ruins, and one near the Eastern Crystalline Structure.
- The Reaper boss uses frost magic, heavy melee attacks, and drain life spells, with 50% frost resistance, making fire-based weapons and magic the most effective damage strategy.
- The Reaper Gem rewards are underwhelming for most players—the axe is mechanically identical to a standard Daedric Battleaxe with no unique enchantment, plus three Daedra Hearts and leveled gold.
- Avoid common mistakes like fighting unprepared, ignoring frost resistance potions, using frost-based offense, or leaving the Soul Cairn without collecting all fragments to ensure you don’t lock yourself out of this hidden encounter.
What Is the Reaper Gem in Skyrim?
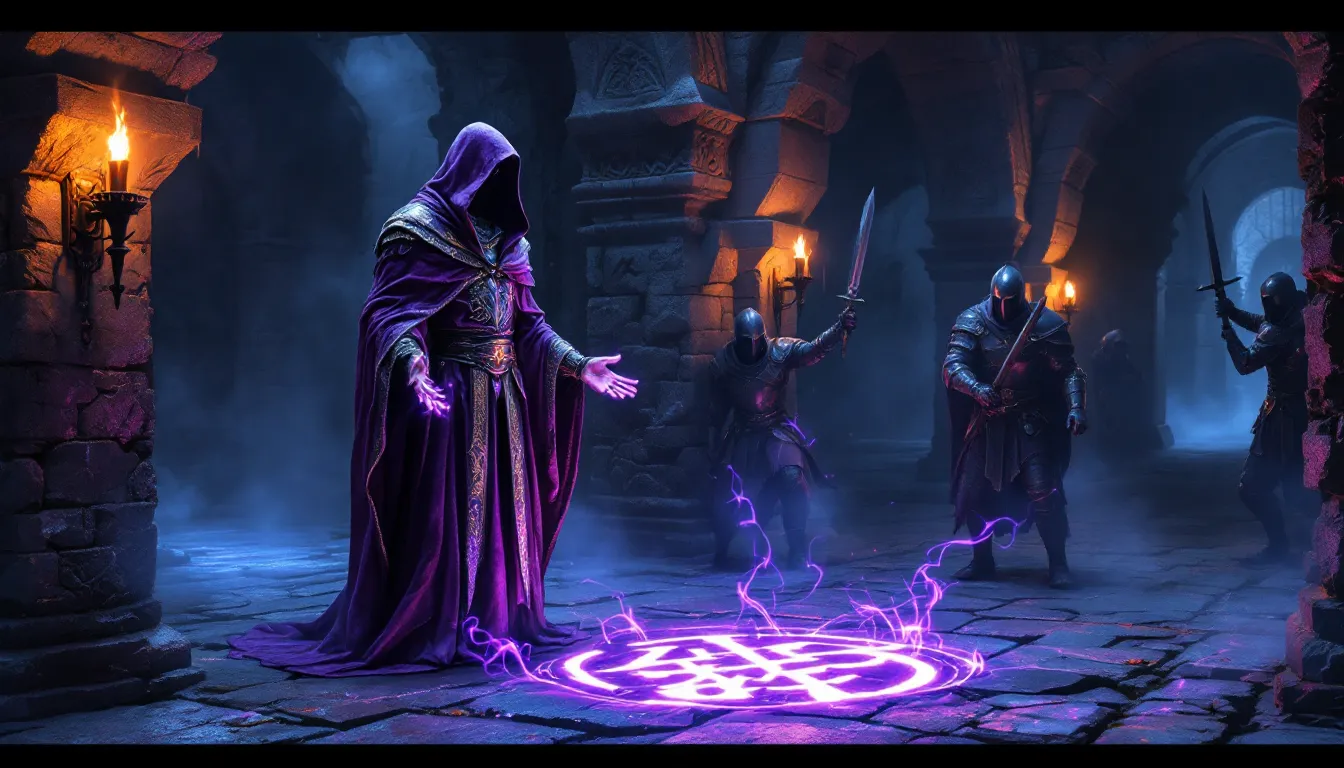
The Reaper Gem is a unique three-piece item hidden throughout the Soul Cairn, the dimension players visit during the Dawnguard DLC questline. It doesn’t serve a traditional gameplay function like weapons or armor. Instead, it acts as a summoning key for The Reaper, a leveled undead boss that appears once the gem is assembled and placed on its pedestal.
Unlike most collectibles in Skyrim, the game never explicitly tells players the Reaper Gem exists. There’s no quest entry, no NPC dialogue pointing toward it, and no map markers guiding the way. Players discover it purely through environmental storytelling, specifically, by noticing three unusual pedestals scattered across the Soul Cairn landscape, each holding a glowing purple gem fragment.
The fragments themselves are called Reaper Gem Fragment items in the inventory. Individually, they’re worthless vendor trash. Together, they unlock one of the few truly hidden boss encounters Bethesda included in the DLC. The Reaper fight itself scales to the player’s level, making it challenging regardless of when they attempt it during a playthrough.
This isn’t content most players stumble into by accident. The Soul Cairn’s main quest path, following Serana to find her mother and retrieve an Elder Scroll, doesn’t bring players near any of the fragment locations. It’s designed for players who explore every corner of the map, the type who check every ruin and investigate every strange structure just to see what’s there.
Where to Find Reaper Gem Fragments in the Soul Cairn
All three fragments sit on pedestals in the open world of the Soul Cairn. None are inside buildings or locked behind puzzles. The challenge is simply finding them in a sprawling, visually monotonous environment where every ruin looks similar and navigation feels deliberately disorienting.
Fragment Location #1: The Reaper’s Lair Entrance
The first fragment sits on a pedestal directly in front of The Reaper’s Lair, the domed structure where players will eventually summon the boss. This location is northeast of the Soul Cairn entrance, roughly in the center-north portion of the map.
The Reaper’s Lair itself is hard to miss, it’s a large, circular stone building with a distinctive architecture that stands out from the generic ruins. The pedestal with the fragment is positioned right at the entrance doorway, making it the easiest of the three to locate.
From the main Soul Cairn entrance (where Valerica’s portal drops players), head northeast. Players will pass several soul fissures and groups of Bonemen. The Lair sits on slightly elevated ground. The Reaper Gem Fragment glows with a purple light, making it visible from a distance once players are in the general area.
Fragment Location #2: The Northern Tower Ruins
The second fragment requires traveling to the far northwestern section of the Soul Cairn. Look for a tall, partially collapsed tower structure near the map’s edge. This is one of the most remote areas of the dimension, far from any quest objectives.
The pedestal sits at the base of this tower, on the southern side. The tower itself is identifiable by its height, it’s one of the tallest standing structures in that quadrant. Players can use the Soul Cairn’s outer wall as a navigation reference: the tower is positioned close to the western wall, in the northern half of the map.
Hostile enemies spawn frequently in this area, including Mistmen and Wrathmen. Clear them first before grabbing the fragment to avoid getting interrupted. The fragment’s purple glow is visible once players approach within about 30-40 meters, but the tower itself should be spotted first as a landmark.
Fragment Location #3: The Eastern Crystalline Structure
The third fragment is located in the eastern section of the Soul Cairn, near a cluster of large purple crystal formations. These crystals are a distinctive landmark, they’re much larger than the small soul fissures scattered everywhere, rising several meters into the air with a bright purple luminescence.
Head east from the Boneyard (the large central area filled with bone piles) toward the map’s eastern edge. The crystalline structure sits between the Boneyard and the eastern wall. The pedestal with the fragment is positioned at the base of the largest crystal, on the western side facing back toward the center of the map.
This location sees heavy enemy spawns. Keepers, the floating, staff-wielding undead, patrol this area frequently and can drain health and stamina quickly if players aren’t prepared. The advanced combat positioning used by Soul Cairn enemies makes fighting near the crystals particularly challenging, as they tend to use the formations as cover.
Take the fragment from the pedestal once the area is clear. With all three fragments collected, the real challenge begins.
How to Assemble the Reaper Gem
Assembly is straightforward once all three Reaper Gem Fragments are in the inventory. Return to The Reaper’s Lair, the circular domed building in the north-central Soul Cairn where the first fragment was collected.
Inside the Lair, players will find a single pedestal in the center of the room, this one is empty, unlike the three pedestals that held the fragments. Approach it and activate it to place the fragments. The game automatically combines all three pieces into a complete Reaper Gem and places it on the pedestal.
The moment the gem is placed, the encounter triggers immediately. There’s no delay, no additional prompt, and no chance to back out. The Reaper spawns within seconds, and the door to the Lair remains open, allowing players to retreat if necessary.
Before placing the gem, make sure preparations are complete:
- Potions (health, stamina, resist frost) should be equipped and hotkeyed
- Gear should be appropriate for the encounter (detailed in the next section)
- Followers should be positioned strategically, Serana is particularly useful here if she’s still accompanying the player during the Dawnguard questline
- Saves should be manual and recent, not relying on autosaves that might overwrite before the fight
Many players who’ve explored tactical positioning for difficult encounters recommend clearing the immediate area outside the Lair as well. If the fight goes poorly and requires a tactical retreat, having a clear escape route prevents getting sandwiched between the Reaper and other Soul Cairn enemies.
The gem itself disappears once used. It can’t be retrieved, sold, or displayed. It exists solely to trigger this boss fight, making it a true consumable key item rather than a collectible.
Summoning and Defeating the Reaper
The Reaper is classified as a unique undead enemy, similar to a leveled draugr but with significantly enhanced stats and abilities. The fight scales to the player’s level at the time of summoning, with the Reaper gaining health, damage, and resistances as player level increases.
The Reaper’s Combat Abilities and Weaknesses
The Reaper wields a unique two-handed scythe and employs a combination of melee and magical attacks. Its combat pattern includes:
- Heavy melee strikes with substantial reach and knockback potential
- Frost magic attacks similar to Ice Storm, dealing both direct damage and stamina drain
- Drain Life spell that siphons player health while healing the Reaper
- High frost resistance (50% base reduction) making frost-based attacks less effective
- Standard undead vulnerabilities to fire damage and anti-undead effects like Turn Undead spells
The Reaper’s health pool scales dramatically. At level 30, it has approximately 1,500 HP. At level 50+, it can exceed 3,000 HP. Its damage output scales similarly, with melee hits capable of dealing 80-150 damage per strike depending on player level and armor rating.
Like other high-tier undead, the Reaper is immune to poison, paralysis, and most crowd-control effects. It can’t be ragdolled by Unrelenting Force, though the stagger effect still applies briefly. Fire-based enchantments and spells deal full damage with no resistance penalty.
The Reaper uses aggressive AI patterns similar to Dragon Priests. It pushes forward constantly, giving little breathing room for healing or repositioning. When player health drops below 30%, it prioritizes Drain Life, creating a feedback loop where the player loses health while the Reaper recovers it.
Best Strategies and Equipment for the Fight
Melee builds should prioritize fire-enchanted weapons. Dawnbreaker, obtained during The Break of Dawn quest, is particularly effective due to its inherent fire damage and explosion effect when killing undead. Any weapon with a fire enchantment works, but higher-tier enchantments (40+ fire damage) make the fight significantly faster.
For armor, focus on frost resistance. The Reaper’s frost magic hits hard, and the stamina drain compounds the problem by limiting power attack options and sprint-dodging. Resistance buffs from:
- Frost Resist potions (50%+ is ideal)
- Resist Frost enchantments on gear
- Ebony Mail (if the player completed Boethiah’s quest) provides poison damage aura that ticks constantly
- Vampire Lord form (if the player chose vampirism during Dawnguard) grants 50% frost resistance inherently
Magic builds should lean heavily into fire destruction spells. Incinerate at Expert level or Fire Storm at Master level both shred through the Reaper’s health. Lightning spells work but lack the effectiveness multiplier against undead. Frost spells are viable but significantly slower due to the Reaper’s natural resistance.
Conjuration builds have an advantage here. Storm Atronachs deal consistent damage and can tank hits while the player stays at range. Two Storm Atronachs with the Twin Souls perk create a damage-sponge situation where the Reaper struggles to focus on any single target. Dremora Lords work too but deal less consistent damage.
Stealth archers, Skyrim’s most common build, should use fire-enchanted arrows or explosive bolts. The Reaper doesn’t have unique detection abilities, so sneak attack multipliers apply normally. Position in the doorway of the Lair, land the opening sneak shot, then reposition to maintain distance. The AI patterns in high-difficulty fights often favor ranged attackers who can maintain spacing.
Follower setup matters. Serana’s necromancy constantly spawns distractions that draw aggro. If she’s not available, tankier followers like Frea or Celann can absorb hits while the player deals damage. Avoid squishy followers, they’ll get one-shot by the Reaper’s heavy attacks.
Potions to bring:
- Resist Frost (mandatory, 50%+ duration)
- Healing (multiple, stacked for quick use)
- Restore Stamina (for power attacks and dodging)
- Fortify Fire Damage (if using fire-based offense)
The fight typically lasts 2-5 minutes depending on build and level. Players who struggle can retreat through the Lair’s entrance, reset positioning, and re-engage with potions and buffs refreshed. The Reaper doesn’t regenerate health if players leave the immediate area, making hit-and-run tactics viable.
Rewards for Defeating the Reaper
The Reaper drops three guaranteed items upon death:
- The Reaper’s Axe – A unique two-handed battleaxe with the Daedric Axe model
- Daedra Heart (3x) – Useful for crafting Daedric gear
- Leveled gold (approximately 500-1,000 depending on player level)
The Reaper’s Axe is the primary reward. It’s a leveled weapon, meaning its base damage scales with the player’s level when the Reaper is defeated. At level 30, it deals approximately 26 base damage. At level 50+, it caps around 29 base damage, identical to a standard Daedric Battleaxe.
The axe has no unique enchantment. It’s essentially a Daedric Battleaxe with a unique name. Players can enchant it themselves, making it functionally identical to any other two-handed weapon of the same tier. For players who’ve already crafted or found Daedric weapons, the axe offers nothing mechanically unique.
The Daedra Hearts have more practical value. Each heart is worth 250 gold and is required for smithing Daedric armor pieces. Players who haven’t invested heavily in the Conjuration perk tree (which allows purchasing hearts from Enthir) may find these useful. For late-game characters, they’re vendor trash.
No unique armor, spells, shouts, or abilities drop from the Reaper. There’s no achievement or quest completion tied to the kill. The game doesn’t acknowledge it happened beyond the loot.
Compared to other hidden boss fights in Skyrim, like the Dragon Priests or the Ebony Warrior, the Reaper’s rewards feel underwhelming. The effort required to locate all three fragments, prepare for the fight, and execute the kill doesn’t match the payoff of a single non-unique weapon and a handful of crafting materials.
Some players value the fight itself as the reward. The Reaper represents one of the few truly hidden, unmarked challenges in the Dawnguard DLC. For completionists or players seeking every unique encounter, that intangible value matters. For players focused on build optimization or loot progression, the Reaper Gem is skippable content without consequence.
Common Mistakes to Avoid When Hunting the Reaper Gem
Rushing the fight unprepared. The most frequent mistake is placing the gem on the pedestal without proper gear, potions, and saves. The encounter triggers instantly with no warning. Players expecting a prompt or dialogue are caught off-guard when the Reaper spawns immediately and starts attacking. Always quicksave before placing the gem, not after entering the Lair.
Ignoring frost resistance. The Reaper’s frost magic chunks health faster than players expect, especially on higher difficulties. Going into the fight with zero frost resist turns it into a potion-chugging sprint where stamina management becomes impossible. A single 50% frost resist potion changes the fight’s pacing dramatically.
Using frost-based offense. Plenty of mage builds and enchanted weapon users lean into frost damage for the stamina drain effect. Against the Reaper, that strategy backfires. Its 50% frost resistance cuts damage output in half, extending the fight and increasing the chance of running out of resources. Fire damage is non-negotiable for efficiency.
Leaving Serana behind. If players are still in the portion of the Dawnguard questline where Serana follows them, she’s an enormous asset in this fight. Her necromancy constantly generates distractions that split the Reaper’s focus. Some players dismiss her before exploring the Soul Cairn to avoid her commentary, bad call if they’re planning to fight the Reaper.
Not exploring thoroughly before leaving the Soul Cairn. Many players complete the main Dawnguard objectives in the Soul Cairn, grab the Elder Scroll, and immediately leave. The portal to exit is right there, and the Soul Cairn isn’t exactly pleasant to explore. But once players leave, returning requires either console commands or being in the specific Dawnguard quest phases that allow re-entry. Miss the fragments on the first visit, and collecting them later becomes a hassle.
Underestimating the Reaper’s health pool. New players sometimes assume it’s a standard enemy with a gimmick. Veteran players who’ve cleared Dragon Priests and legendary dragons might go in overconfident. The Reaper scales harder than most unique enemies, and its health regeneration from Drain Life means sloppy DPS turns into a war of attrition the player can lose.
Trying to cheese the fight from outside the Lair. Some players attempt to snipe the Reaper from the doorway or use terrain exploits to trivialize the encounter. While possible, the Reaper’s AI sometimes resets if it can’t path to the player, regenerating to full health and forcing a restart. Legitimate strategies that use the doorway for positioning are fine, but full-on exploits risk wasting time.
Forgetting to check community resources for build optimization before attempting the fight. The Reaper punishes builds that aren’t tuned for high-damage output or survivability. Players running experimental or roleplay builds might find themselves hard-stuck without the tools to finish the encounter efficiently.
Is the Reaper Gem Worth the Effort?
For completionists and lore enthusiasts, absolutely. The Reaper Gem represents one of Skyrim’s few genuinely hidden secrets. No quest markers, no hand-holding, just environmental storytelling and player-driven exploration. Finding all three fragments and summoning the Reaper feels like discovering cut content or an easter egg, even though it’s fully intentional.
For players chasing unique loot, not really. The Reaper’s Axe is functionally identical to a standard Daedric Battleaxe. It looks the same, deals the same damage, and has no special enchantment. The Daedra Hearts are nice if the player is early in their Smithing grind, but they’re not rare enough to justify a boss fight. Any player who’s completed the main Dawnguard questline and explored Apocrypha in Dragonborn has access to better rewards with less effort.
From a difficulty standpoint, the Reaper offers a legitimate challenge without being unfair. It’s harder than most Dragon Priests but easier than the Ebony Warrior or Karstaag. Players who enjoy testing their builds against tough enemies will find the fight satisfying. Those who min-max or overlevel before Dawnguard will steamroll it in under a minute.
The time investment is moderate. Locating all three fragments takes 15-30 minutes depending on navigation efficiency and enemy interference. The fight itself lasts 2-5 minutes. For half an hour of effort, the payoff is underwhelming if measured purely in loot value. If measured in experience, checking off one of the game’s hidden encounters, it’s worthwhile for players who care about that.
Casual players who aren’t completionists can skip the Reaper Gem entirely without missing anything mechanically significant. The Soul Cairn’s main questline doesn’t interact with it, and no other content is locked behind defeating the Reaper. It’s purely optional content for players who want to squeeze every bit of content out of the DLC.
For builds that struggle with undead enemies, the effort might not be worth the frustration. Stealth archers and destruction mages handle it smoothly. Builds that rely on poison, paralysis, or crowd control will have a rougher time and might find the fight tedious rather than challenging.
Conclusion
The Reaper Gem stands as one of Skyrim’s most deliberately obscure secrets. It doesn’t advertise itself, doesn’t tie into any major questlines, and offers rewards that won’t revolutionize a build. But that’s exactly what makes it memorable in a game that usually holds the player’s hand through every objective.
Tracking down the three fragments scattered across the Soul Cairn requires actual exploration, not following markers, not completing fetch quests, just wandering a hostile dimension and paying attention to the environment. Summoning the Reaper tests combat readiness in a way most Dawnguard content doesn’t. The fight itself is tuned well enough to challenge mid-level characters without feeling artificially difficult.
The rewards don’t match the effort for most players. A non-unique axe and some crafting materials aren’t compelling loot. But the experience of finding something the game never told you existed, that’s worth more than vendor gold. For players who’ve exhausted Skyrim’s marked content and want to dig into the hidden layers Bethesda tucked away, the Reaper Gem delivers exactly what it promises: a secret for players who go looking for them.